API Documentation
1. Generate API Key:
- First, you need to create a website for your account.
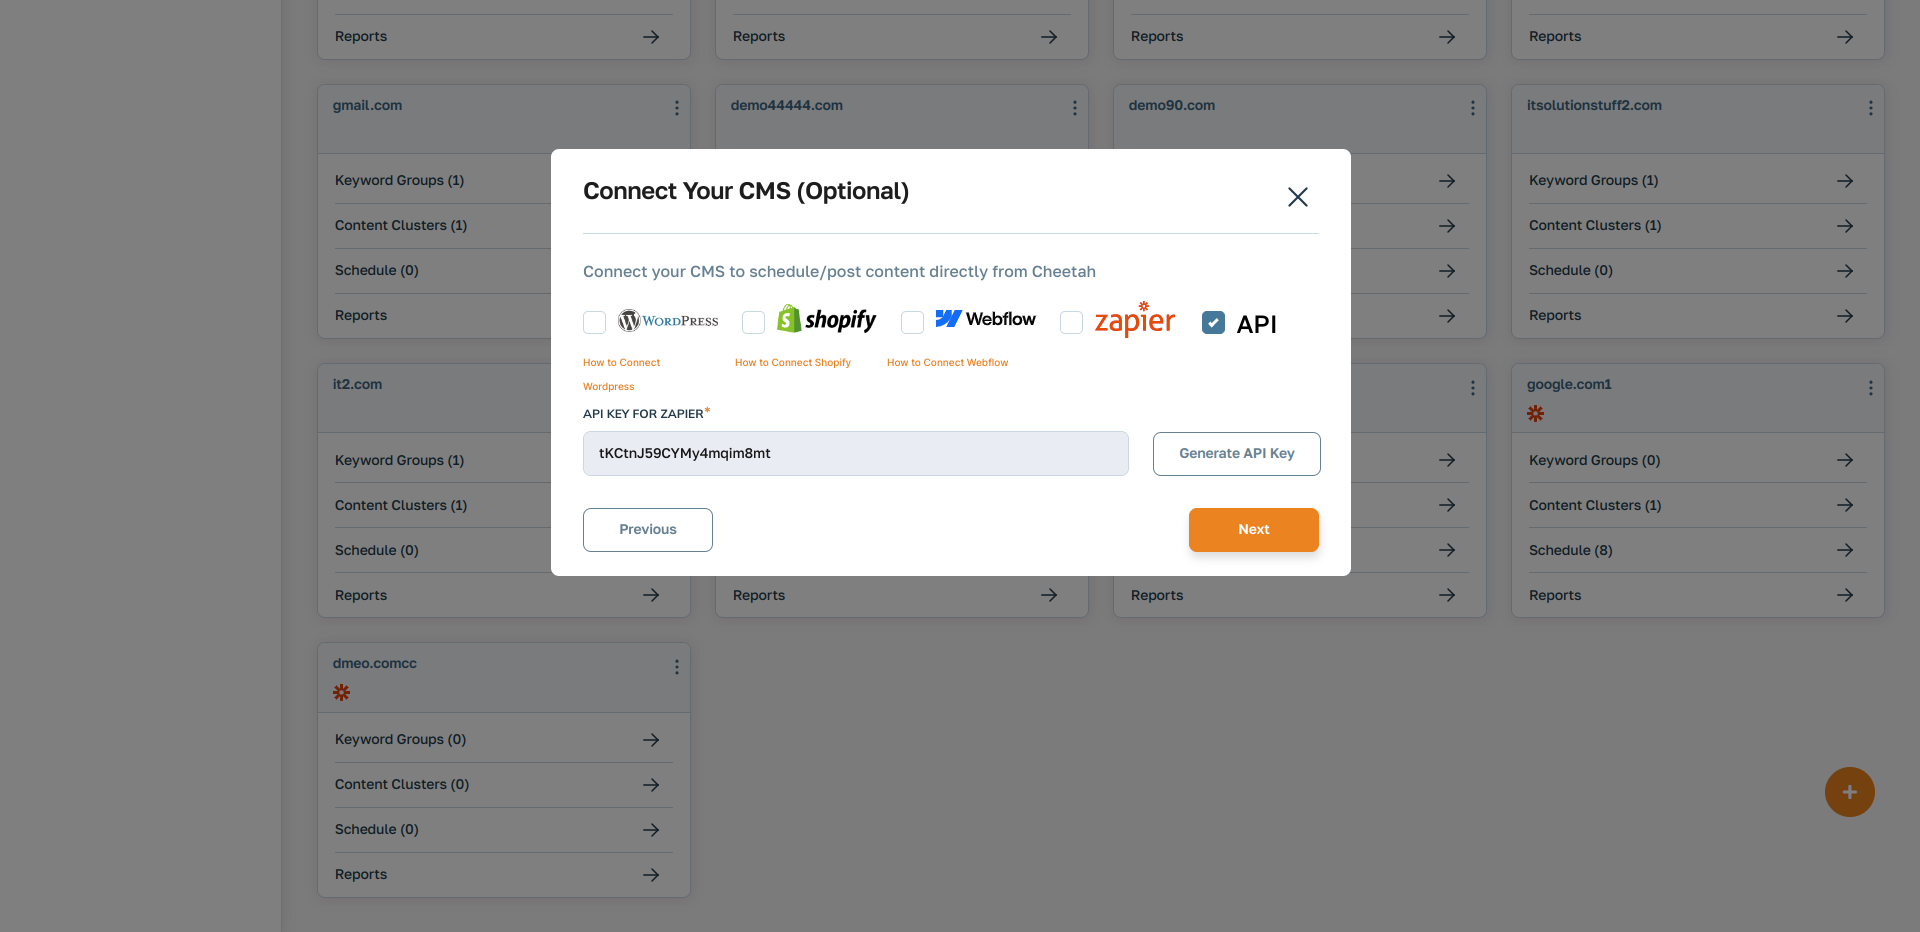
- In the Connect Your CMS section, you need to choose the API option and generate an API key.
- You need to keep a secret and save that API Key to use API access. You can see the below screenshot to generate the API Key.

2. Get Published Posts:
This API documentation describes how to use the "Get Published Posts" endpoint of the PostCheetah API. Below, I'll break down the documentation into understandable parts:
API Request:
To retrieve published posts, you need to send a POST request to the specified endpoint (`https://postcheetah.com/api/latest-posts`) along with the API key provided in the request body. Here's an example of how you can make the request using curl:
curl -d '{"api_key": "tKCtnJ59CYMy4mqim8mt", "page": "1"}' -H "Content-Type: application/json" -X POST https://postcheetah.com/api/latest-postsSuccess Response:
If the request is successful, you'll receive a JSON response containing an array of published posts. Each post object in the array includes the following fields:
- id: The unique identifier for the post.
- title: The title of the post.
- body: The content/body of the post.
- slug: A URL-friendly version of the title.
- meta_description: Meta description for the post.
- featured_image: URL to the featured image of the post.
- status: The status of the post (which should be "publish" in this case).
Here's an example of a successful response with two published posts:
{
"data": [
{
"id": 1,
"title": "This is sample title",
"body": "This is sample body",
"slug": "this-is-sample-slug",
"meta_description": "This is sample Meta Description",
"featured_image": "https://postcheetah.com/uploads/frontSetting/logo-new_SGn1698673541.svg",
"status": "draft",
"publish_at": "",
},
{
"id": 2,
"title": "This is sample title 2",
"body": "This is sample body 2",
"slug": "this-is-sample-slug 2",
"meta_description": "This is sample Meta Description",
"featured_image": "https://postcheetah.com/uploads/demo.svg",
"status": "publish",
"publish_at": "07-08-2024",
}
],
"current_page": 4,
"per_page": 10,
"total": 105,
"last_page": 11
}
Error Responses:
The API provides error responses for cases when something goes wrong with the request. There are two possible error responses described:
1. Missing API Key: If the API key field is not provided in the request body, you'll receive an error response indicating that the API key field is required.
{
    "error": "The api_key field is required."
}
2. Wrong API Key: If the provided API key is invalid, you'll receive an error response indicating that the API key is invalid.
{
    "error": "The api_key field is invalid."
}
These error responses help in troubleshooting and handling errors gracefully in your application when interacting with the PostCheetah API.
3. Get Published Pages:
This API documentation describes how to use the "Get Published Pages" endpoint of the PostCheetah API. Below, I'll break down the documentation into understandable parts:
API Request:
To retrieve published posts, you need to send a POST request to the specified endpoint (`https://postcheetah.com/api/latest-pages`) along with the API key provided in the request body. Here's an example of how you can make the request using curl:
curl -d '{"api_key": "tKCtnJ59CYMy4mqim8mt", "page": "1"}' -H "Content-Type: application/json" -X POST https://postcheetah.com/api/latest-pagesSuccess Response:
If the request is successful, you'll receive a JSON response containing an array of published pages. Each post object in the array includes the following fields:
- id: The unique identifier for the post.
- title: The title of the post.
- body: The content/body of the post.
- slug: A URL-friendly version of the title.
- meta_description: Meta description for the post.
- featured_image: URL to the featured image of the post.
- status: The status of the post (which should be "publish" in this case).
Here's an example of a successful response with two published posts:
{
"data": [
{
"id": 1,
"title": "This is sample title",
"body": "This is sample body",
"slug": "this-is-sample-slug",
"meta_description": "This is sample Meta Description",
"featured_image": "https://postcheetah.com/uploads/frontSetting/logo-new_SGn1698673541.svg",
"status": "publish",
"publish_at": "07-08-2024",
},
{
"id": 2,
"title": "This is sample title 2",
"body": "This is sample body 2",
"slug": "this-is-sample-slug 2",
"meta_description": "This is sample Meta Description",
"featured_image": "https://postcheetah.com/uploads/demo.svg",
"status": "draft",
"publish_at": "",
}
],
"current_page": 4,
"per_page": 10,
"total": 105,
"last_page": 11
}
Error Responses:
The API provides error responses for cases when something goes wrong with the request. There are two possible error responses described:
1. Missing API Key: If the API key field is not provided in the request body, you'll receive an error response indicating that the API key field is required.
{
    "error": "The api_key field is required."
}
2. Wrong API Key: If the provided API key is invalid, you'll receive an error response indicating that the API key is invalid.
{
    "error": "The api_key field is invalid."
}
These error responses help in troubleshooting and handling errors gracefully in your application when interacting with the PostCheetah API.


